

F1 25 Best Wheel & Force Feedback (FFB) Settings: Logitech, Thrustmaster & Fanatec
Practical, baseline-first calibration for F1 25 wheel settings. Conservative starting presets by wheel type, symptom-to-setting mapping, a repeatable small-step test loop, and a concrete Abu Dhabi example using published Race and Qualifying setups.
On this pageTap to expand
Introduction & baseline: what this guide fixes
This guide is a hands-on calibration checklist for F1 25 wheel settings: start with a conservative baseline, run repeatable test laps, change one setting small-step, and log results. It targets Logitech (gear-driven), Thrustmaster (belt/gear hybrid) and Fanatec (Direct Drive) users and focuses on what to feel on-track, which setting to change to fix that feeling, and what over-correction looks like.
Baseline-first flow: set a conservative game baseline and neutral wheel firmware, drive a controlled test lap on the same car and tyres, note symptoms, then change a single setting by one small step and re-test. Repeat until improvements plateau. This process prevents compounding effects and keeps lap-time changes attributable to one variable.
Validate your final car setup in race conditions
Use a technical race setup at the Hungaroring to judge low-speed steering load, traction detail, and kerb absorption after FFB changes.
View Hungary Race SetupBaseline presets by wheel type (how to start)
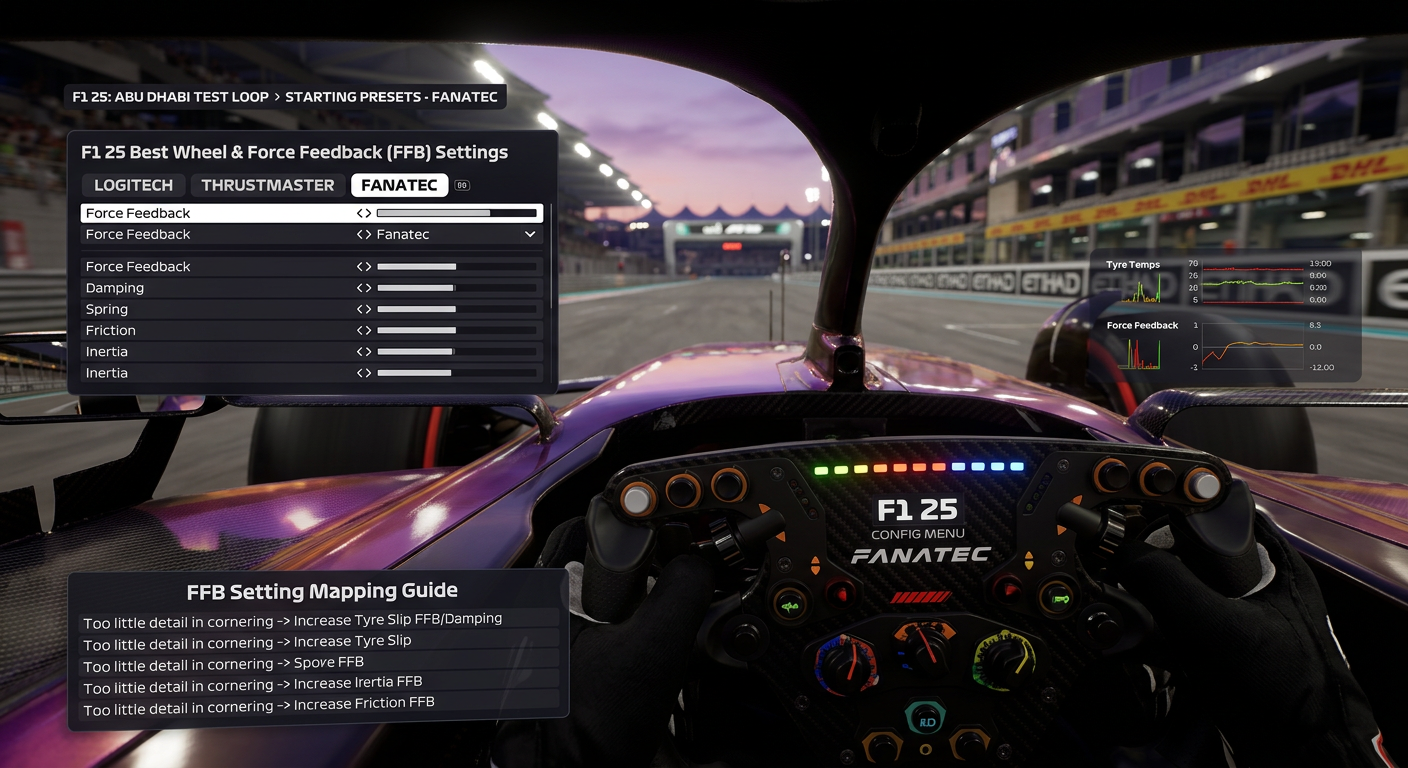
Different wheel drives present force and detail differently — set a conservative starting point for each type, then iterate with the test loop. Keep the game-level baseline low enough to avoid clipping but high enough to feel kerbs.
- Logitech (gear-driven, e.g., G29/G920) — Start conservative: lower overall force and slightly higher wheel damper to tame gear-driven oscillation. Expect less fine kerb texture than belt or DD wheels.
- Thrustmaster (belt/gear hybrid, e.g., T300) — Moderate overall force and moderate damper: belt systems transfer more mid/high-frequency detail than gear wheels, so allow slightly higher On-Track Effects.
- Fanatec (Direct Drive, e.g., CSL DD or higher) — Higher fidelity: allow higher overall force and lower artificial damping to preserve detail; reduce center-spring inside game if you use strong wheel-centering in firmware.
Quick baseline symptom to watch on the first lap: clipping (jerky, sudden limits), numbness (no kerb or aero cues), or oscillation (wheel shaking after kerb). If any of these appear, stop and reduce global strength or increase damper before further tuning.
Read the controller-side calibration guide
Pair wheel FFB changes with controller input calibration to ensure consistent steering input.
Best F1 25 Controller SettingsKey FFB terms explained (what each setting changes)
Understanding what the game-level sliders do is essential before you change anything. Below are the common FFB terms and the sensations or problems they control.
- Overall Force — global scaling of the full feedback signal. Raises or lowers every effect. Symptom fixed: too-weak or clipping feedback. Over-correction: wheel constantly heavy, clipping risk.
- On-Track Effects — core lateral load: tyre grip transitions, aerodynamic load changes and steady corner forces. Symptom fixed: loose or vague turn-in and mid-corner feel. Over-correction: twitchy steering and exaggerated load.
- Rumble Strip Effects — low-frequency kerb and surface texture. Symptom fixed: missing kerb cues and poor exit timing. Over-correction: constant buzz that masks finer feel.
- Wheel Damper — artificial smoothing that resists rapid wheel motion. Symptom fixed: high-frequency oscillation and post-kerb shake. Over-correction: slow, sluggish corrections and delayed steering response.
- Understeer Effect / Center Spring — add load during understeer or provide centering force. Symptom fixed: sudden snap to oversteer or very loose center. Over-correction: false centering that hides actual grip loss.
Learn aerodynamic impact on steering feel
Aerodynamic setup alters high-speed loads; pair aero tuning with FFB calibration for consistent steering across fast and mixed-downforce circuits.
How to Adjust Aerodynamics F1 25Symptom-to-setting mapping: quick reference
- Entry vagueness (loose turn-in): Increase On-Track Effects slightly or reduce Wheel Damper. Over-correction = twitchy, immediate steering response and reduced stability.
- Mid-corner numbness (flat feel through apex): Raise On-Track Effects and Effects Scaling. Over-correction = heavy continuous pull that hides losing rear grip cues.
- Kerb/rumble silence: Increase Rumble Strip Effects. Over-correction = constant low-frequency noise masking lateral load changes.
- High-frequency oscillation after kerb: Increase Wheel Damper in small steps. Over-correction = sluggish steering that lags recovery inputs.
- Brake/turn load spikes or clipping: Lower Overall Force or reduce Center Spring; over-correction = too soft, losing important aero and tyre cues.
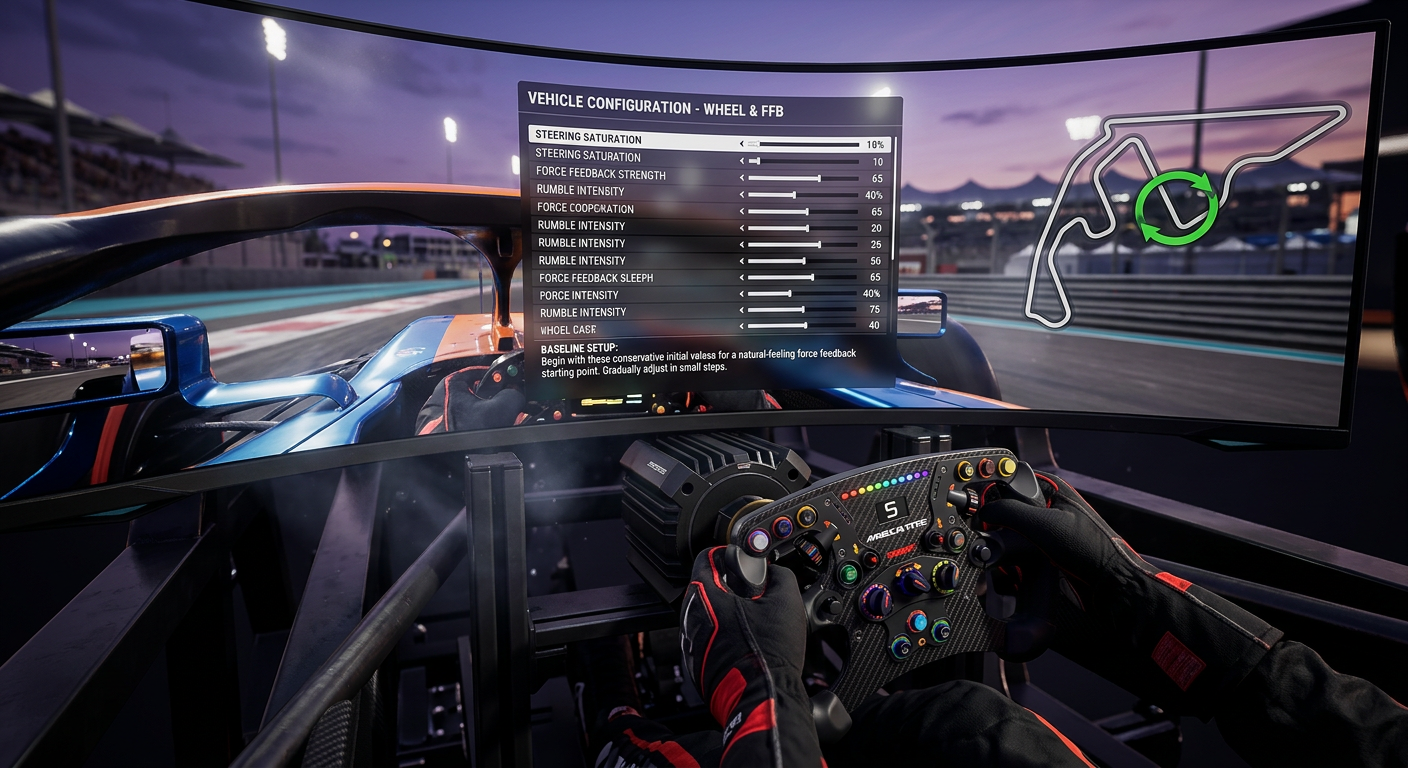
Repeatable small-step testing loop (how to iterate safely)
Use a consistent test loop: same car, tyre, fuel, and track section. Run a baseline, change only one setting per iteration by a small, repeatable step, and log subjective and objective results. The phrase F1 25 wheel settings matters here because small, repeatable changes win more consistently than large one-shot moves.
- Step 0 — Baseline: load a conservative baseline and reset wheel firmware centering to neutral.
- Step 1 — Test lap: pick one mixed-speed section you know well and drive 3 clean laps for baseline numbers.
- Step 2 — Change one setting only: move the chosen slider by one small step (suggested: one UI tick or 5–10% of slider travel if the UI uses percent).
- Step 3 — Re-test: drive 3 clean laps and log subjective notes (turn-in, mid-corner load, kerb detail) and objective lap times or consistency.
- Step 4 — Decide: if better, keep the change; if worse, revert and try the opposite direction with the same step size. Stop when two consecutive steps show no meaningful subjective improvement.
Practical log template: Setting changed | Step size | Lap times (3 laps) | Subjective notes | Decision (keep/revert). Repeat until improvements stall. Re-run the loop after major firmware updates or game patches.
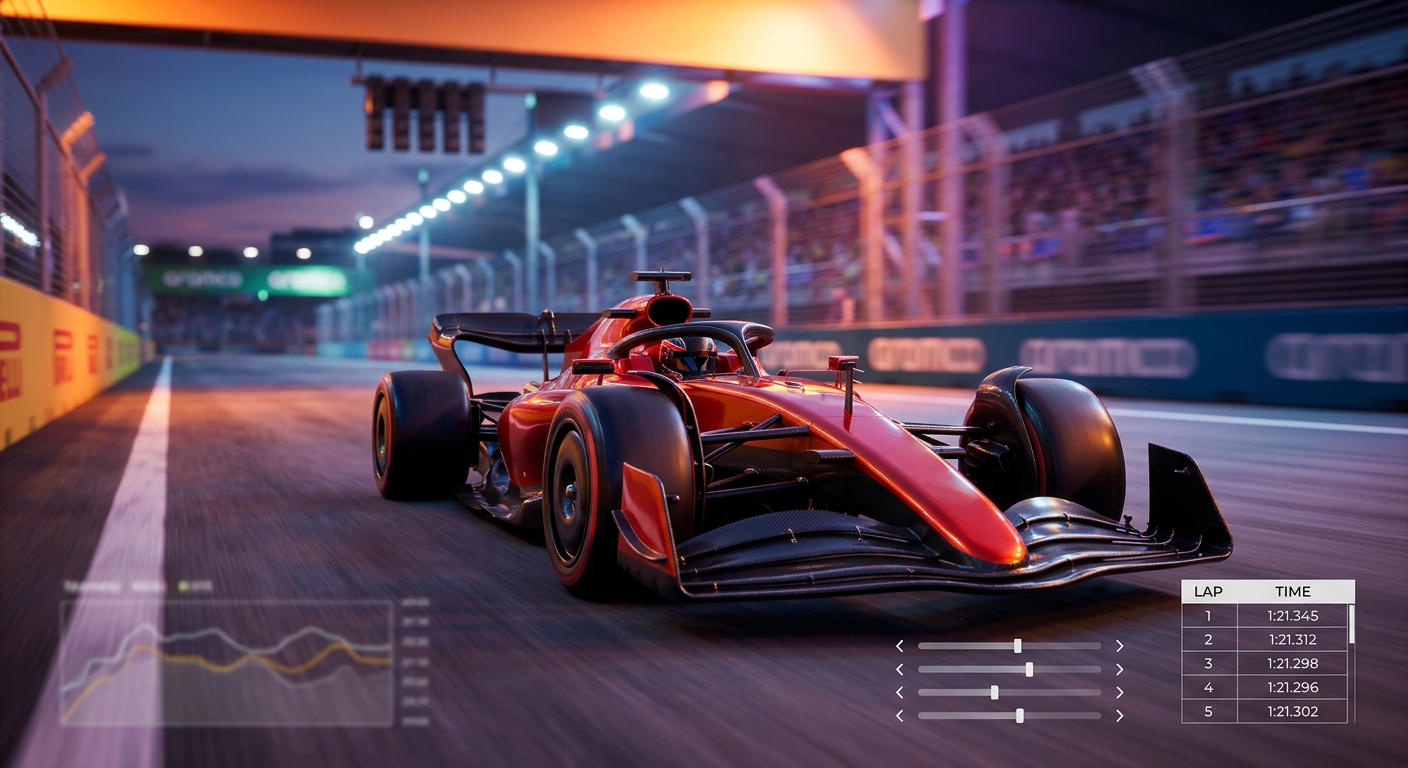
Test changes against a high-speed qualifying setup
Use a faster, aero-loaded qualifying setup to check whether your wheel still feels readable through rapid direction changes.
View Great Britain Qualifying SetupConcrete example: compare a technical race baseline with a high-speed qualifying check
Use the published Hungaroring race setup and the Silverstone qualifying setup as a practical contrast. The Hungaroring race build helps you judge low-speed traction, steering weight build-up, and kerb absorption over a stint, while the Silverstone qualifying example exposes whether your FFB is too sharp or too muted when aero load rises quickly through fast direction changes.
How aero changes affect feel: the qualifying setup increases both front and rear wing settings (higher downforce). Expect stronger sustained steering loads at medium and high speed and clearer kerb feedback due to higher aerodynamic load. In response, increase On-Track Effects slightly to preserve mid/high-speed load fidelity; if you feel post-kerb oscillation after the aero increase, add a small amount of Wheel Damper.
Concrete on-track scenario: after fitting the Qualifying aero (Front Wing 32 / Rear Wing 22), you do three test laps and feel 'a heavier steady pull through the high-speed Turn 7-8 complex but clearer kerb hits.' That confirms the higher downforce is delivering more steady load — raise On-Track Effects by one small step to make the mid-corner changes crisper, or lower Wheel Damper slightly if the wheel becomes too sluggish in response.
Open the Hungaroring race setup
Use this technical race setup to judge traction, kerb detail, and low-speed steering load before you fine-tune FFB.
View Hungary Race SetupTranslating a setting change into on-track feeling
- Dead center until apex, then heavy tug — likely low On-Track Effects or too-strong Center Spring. Fix: +On-Track Effects small-step; over-correction = sudden twitch at turn-in.
- Constant vibration on straights — likely Rumble Strip Effects too high or clipping. Fix: -Rumble Strip Effects or -Overall Force; over-correction = numb straights with lost kerb cues.
- Wheel oscillates after kerb — likely low Wheel Damper. Fix: +Wheel Damper small-step until oscillation stops; over-correction = sluggish steering and slower recovery from slides.
💡Tip: use both feel and consistency
A small subjective improvement that produces more consistent lap times is better than a large-feel change that increases lap time variance. Always log three laps after each change.
Final recommended configuration (placeholders)
The brief does not include wheel-specific numeric FFB values for each manufacturer or model, so exact numeric game slider values must be validated per wheel. Below is a mandatory config-placeholder listing every in-game and common wheel-software setting the editor/tester must measure and fill with tested numeric values.
Required numeric settings to validate and publish
Replace each item with the validated numeric value (game UI percent, slider tick, or wheel software unit) after testing the baseline and running the small-step loop on each wheel model.
- Overall Force = REPLACE_WITH_VALUE
- On-Track Effects = REPLACE_WITH_VALUE
- Rumble Strip Effects = REPLACE_WITH_VALUE
- Wheel Damper = REPLACE_WITH_VALUE
- Understeer Effect = REPLACE_WITH_VALUE
- Center Spring = REPLACE_WITH_VALUE
- Effects Scaling (if present) = REPLACE_WITH_VALUE
- Wheel firmware overall strength = REPLACE_WITH_VALUE
- Wheel firmware centering strength = REPLACE_WITH_VALUE
Validate changes with Silverstone qualifying
Confirm the final wheel values still feel stable once aero load builds quickly in a sharper qualifying setup.
View Great Britain Qualifying SetupQuick checklist, links and next steps
- Reset wheel firmware centering and the game to a conservative baseline.
- Run 3 baseline laps on the same car, tyres, and fuel through the same mixed-speed sector.
- Change only one setting by one small step, then re-run 3 laps and log results.
- Keep or revert based on lap consistency and subjective feel, then repeat until the gains plateau.
- Fill the config-placeholder with validated numeric values per wheel model before publishing.
Supporting calibration guides
Pair FFB calibration with controller and aero tuning to get the full benefit.
Best F1 25 Controller SettingsAerodynamics tuning reference
Aerodynamic setup alters high-speed loads; pair aero tuning with FFB calibration for consistent steering across fast and mixed-downforce circuits.
How to Adjust Aerodynamics F1 25FAQ
Why am I asked to use placeholders instead of publishing numbers?
The brief does not include wheel-specific numeric FFB values. Exact slider values must be validated per wheel model and firmware because torque range and detail differ drastically.
How large should a 'small step' be when testing?
Use one UI tick or roughly 5–10% of the available slider travel as a repeatable small-step. Keep changes consistent so log entries are comparable.
Do aero setup changes require re-calibrating FFB?
Yes. Higher downforce (example: Qualifying Front Wing 32 / Rear Wing 22) increases steady steering loads and can reveal or mask feedback detail, so re-run the small-step loop after aero changes.
Keep Exploring
Continue from this guide with related hubs and circuit pages.
Related Setups
Apply the knowledge from this guide with a ready-made setup.